In picture book, a collection is defined as a list of image nodes. To create a collection, select the
new Collection option in the
File menu as shown in the following figure:

Figure 2
After selecting
new Collection a small panel will pop up to prompt for the collection name and its contents. Type a valid name for the collection in the name field and click on the
include Directory and/or
include files... buttons to add image nodes. (For detailed instructions of adding image nodes consult the
Collection Management section.) Click on the OK button when the user wishes to complete the process.
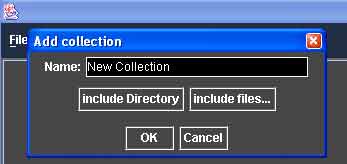
Figure 3
Collections can be saved to and loaded from list files. The list files that are used by picture book are in xml format. To open a file, click on the Open List File option as shown in Figure 2. A file browser will pop up to prompt for a specific file to open. After selecting the correct file click ok. The file will be loaded into picture book. Once a list file is opened all of its contents will be loaded into picture book. If the same collection name is being used by one of the existing collections picture book will prompt for a unique name for the new collection.
The collections of a picture book can be saved to a list file. The user can save the collections by selecting the
Save Lists option from the
File menu.
(See Figure 2) By default the collections are saved in a list file named default.xml in the working directory of the program. Use the
save list as option in the
File menu to save the collections in a file named other than defualt.xml.
